Disclaimer: Please note that some of the links below are affiliate (Amazon) links and I will earn a small commission if you purchase through those. I only suggest products that I use and love and that I know you will, too! Please let me know if you have any questions about anything listed below.
I made no less than about 12 batches of these gluten-free yeast dinner rolls until I got them just right! Not kidding. I tried different flours, adding eggs, and varying amounts of yeast. Pretty sure I was having a dance party in my kitchen when I finally got it!
I think it’s important that I share this recipe with everyone!
The Flour is Key
One little secret I have is the kind of flour that we like to use for breads/pizza crusts. This very special flour is called Caputo Fiore Glut. Caputo is an Italian company based in Naples, AKA the birthplace of pizza. We use this gluten-free flour for our pizzas we make.
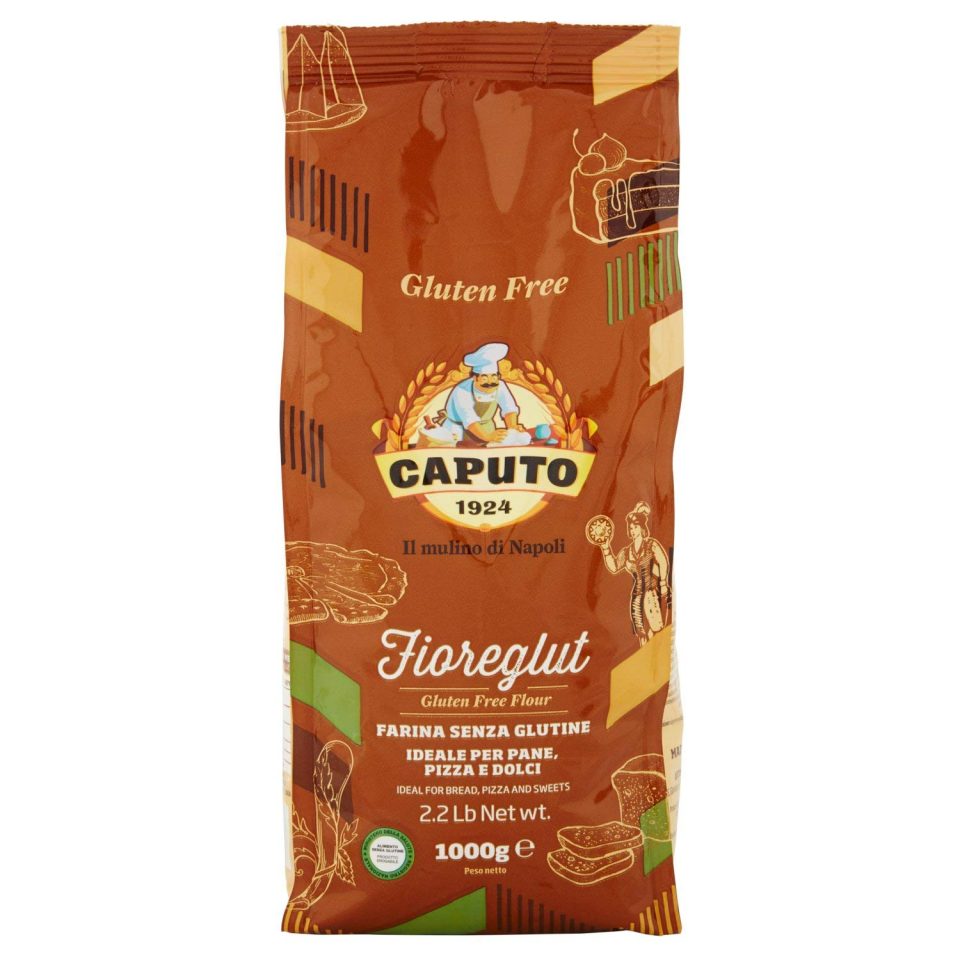
In the past we have special-ordered the flour from one of our local Italian restaurants. But, we typically order it off of Amazon. One of the reasons it’s great for these types of recipes is that it is very fine. It doesn’t have a gritty texture. Another factor that helps in the consistency of these rolls and our pizza dough is that this flour contains wheat starch. Let me explain about why I’ve decided it’s safe for myself to consume.
What Exactly Is Gluten-Free Wheat Starch
I completely understand why it’s frightening to see the word “wheat” in a gluten-free product. Yes, that’s VERY true that we shouldn’t be eating products with regular old wheat in it. But the starch of the wheat grain is a completely different part from the protein portion, otherwise known as gluten. This gluten protein is what causes the auto-immune reaction in those with Celiac Disease.
Please note that if you have a wheat allergy, you absolutely cannot consume this product! Wheat starch is still wheat (it’s just not gluten).
I found a helpful explanation on the Gluten-Free Living website describing the process is for separating out the wheat starch:
“The main components of wheat are fiber, starch and gluten protein. Extraction involves milling the wheat into flour, making dough and washing out the starch. Starch dissolves in water but gluten does not, so the gluten-protein sediment sinks to the bottom. Then the starch solution can be drained off and dried.“
The FDA does also allow wheat starch in gluten-free foods if they are labeled gluten-free and can confirm that the proper testing has been done.
Italians Just Know What They’re Doing
You will also notice this green label on the bag of gluten-free Caputo flour. This green label denotes that the product is registered with the Italian Ministry of Health Gluten-Free Foods.
I did quite a bit of research regarding this symbol. This proved to be quite difficult because everything I found was written in Italian – a language which I do NOT speak or read. This symbol means that it is on a national registry for foods that are safe for people with Celiac Disease to consume.
In order to get this green symbol, the products need to meet certain regulations by the Italian Celiac Association (AIC). AIC might sound familiar to you because they are more well-known for how they certify restaurants. If you haven’t heard yet, Italy is amazing for gluten-free and celiac-safe restaurants. Here is another resource with a list of requirements by the AIC: https://www.italianfoodexcellence.com/gluten-free-certification/.
Here are a few more links to resources regarding gluten-free product testing, the AIC, and the Italian Ministry of Health’s Gluten-Free Foods:
Italian Ministry of Health Registry of Gluten-Free Foods
Did you know that Italians with Celiac Disease can also get a monthly stipend from the government to help pay for their gluten-free foods? That’s amazing!!! This green symbol also indicates the products meet certain requirements and are eligible to be purchased with the stipend from that program.
Celiac Disease Foundation has a nice explanation on their website about the steps Italy takes to help their residents with Celiac Disease. You can read about it HERE.
Another reason that I feel comfortable eating this product with wheat starch in it is because I have been to Italy. They know what they are doing when it comes to gluten-free foods. Italians take it seriously. I am sure that during my travels there in 2018 that I consumed products with wheat starch when I dined out. My time there was some of the most glorious couple of weeks since my diagnosis. Gluten-free foods are available everywhere. And the taste and texture was just like all the other regular foods there. I have a full blog post about my trip to Italy with lots of photos of all the yummy food I was lucky enough to indulge in!
I Really Want To Make This Easy For You, But…
Even though this Caputo flour is what we typically use for breads/pizza dough in our house that doesn’t mean you have to as well. I understand that it’s not as readily available as the flour blends you can purchase on your next run to the grocery store. And I also know that some people might be hesitant to use products with wheat starch.
For those reasons, I did also test this recipe using the Cup4Cup flour which I have been using recently. I like the finer texture of this flour compared to Bob’s Red Mill 1-to-1 Gluten-Free Flour Blend. I have been a loyal Bob’s Red Mill user since the beginning of my diagnosis, but I have noticed it can be dry and kind of gritty so I am expanding my horizons and trying some other options recently.
I’ll be completely honest with you. The Caputo flour just works better. Because it is so fine and because it is made with certain ingredients it absorbs the liquid better and it gives a nice stretch in the bread. This stretch and chewiness is what we love about regular breads. You can still use the Cup4Cup with this recipe, but they will be denser, drier, and flatter. The flavor is there, but the texture is just not perfect yet. I can keep working on that for you!
Gluten-Free Bread Dough vs. Regular Bread Dough
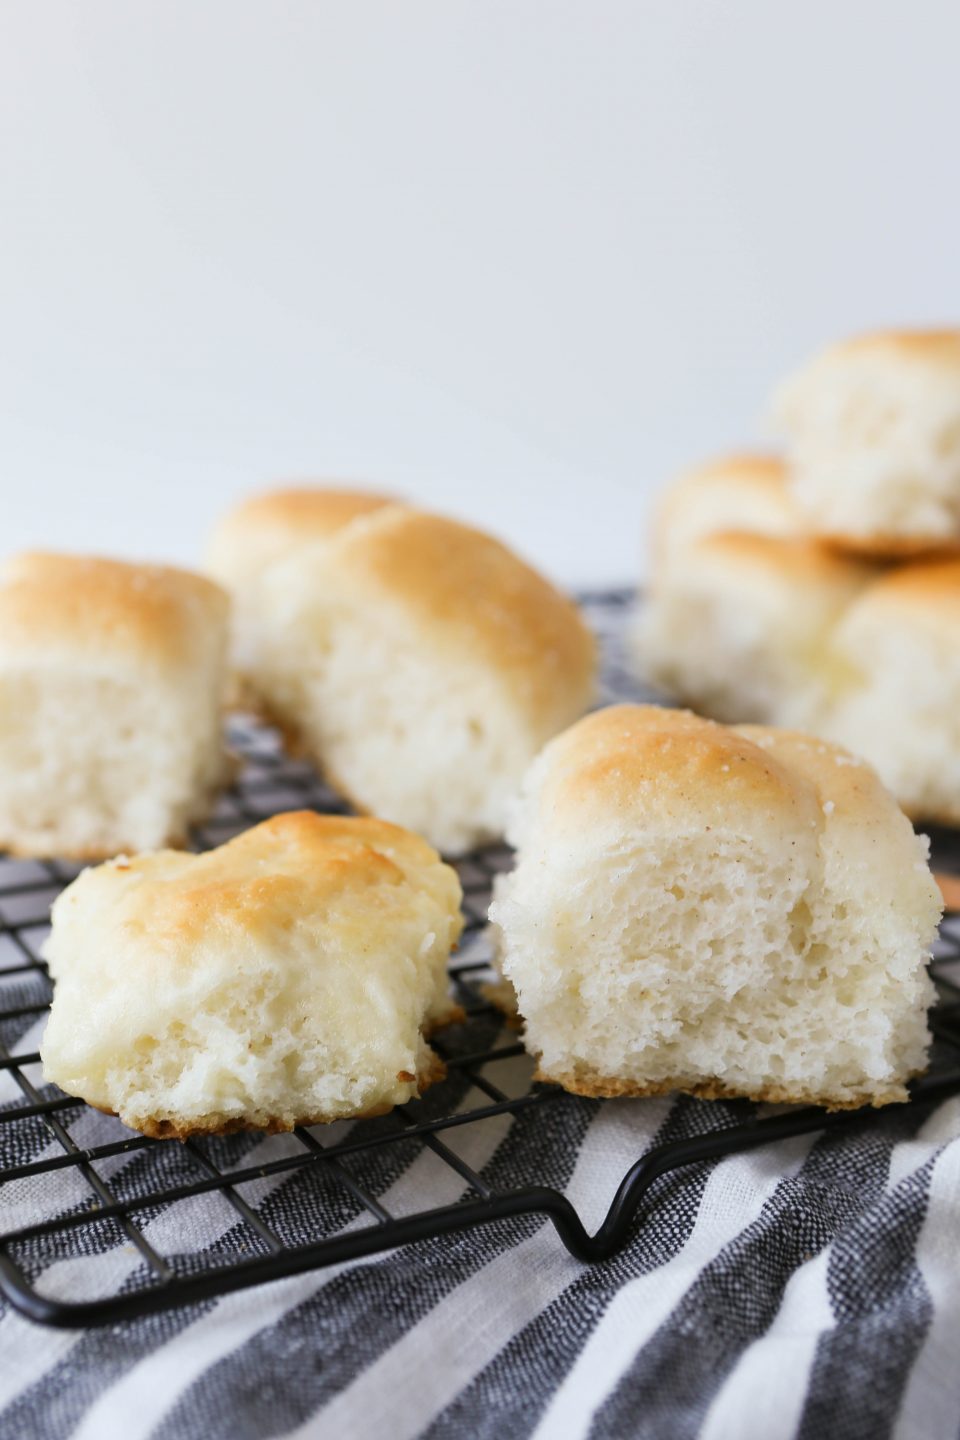
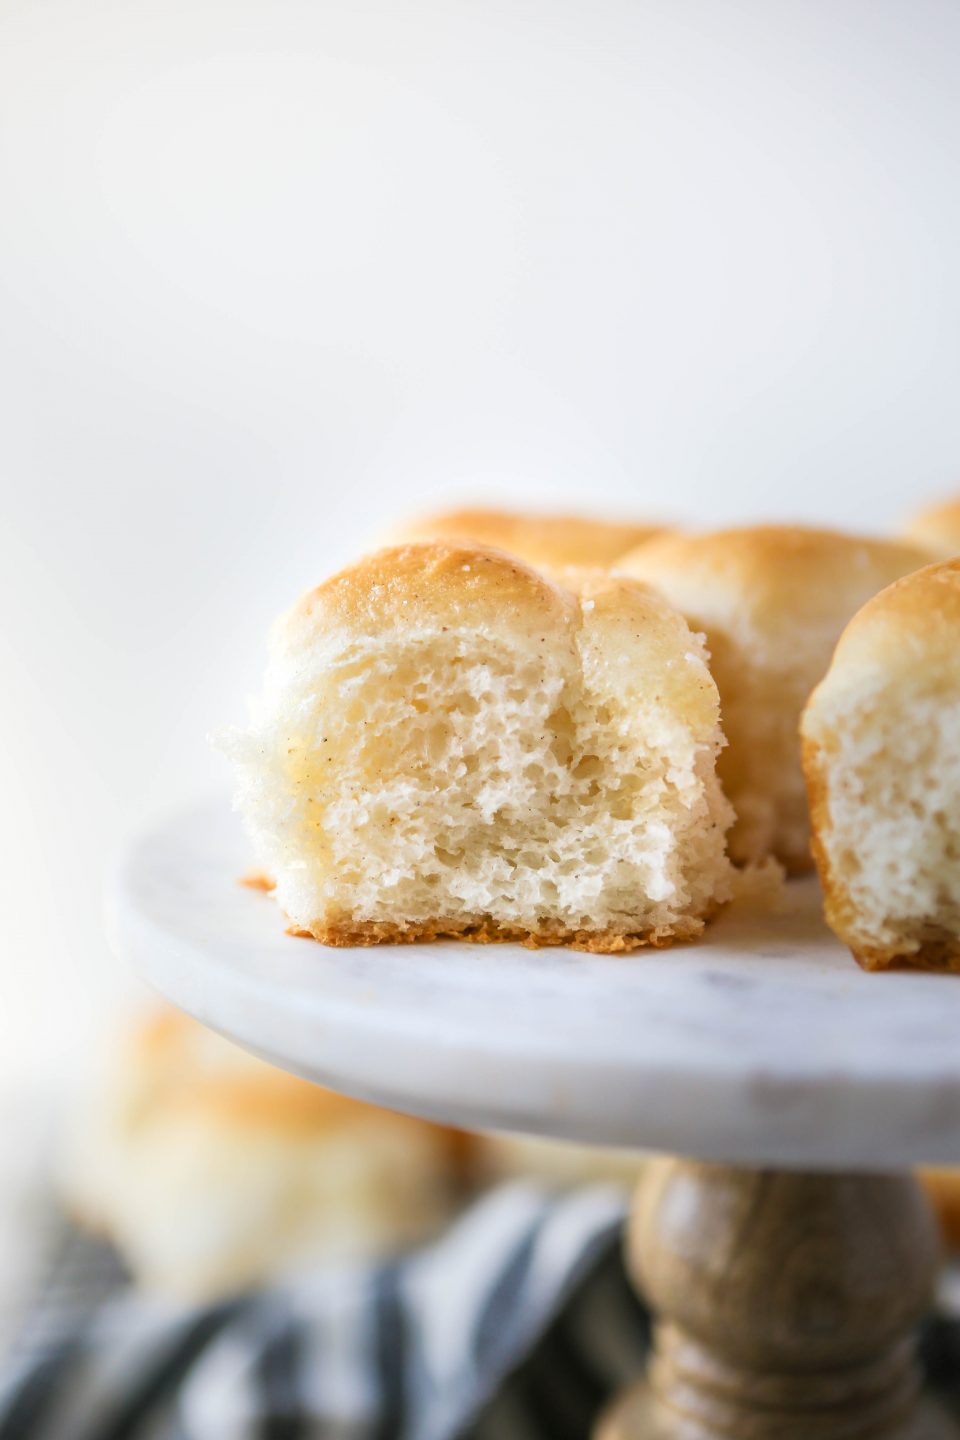
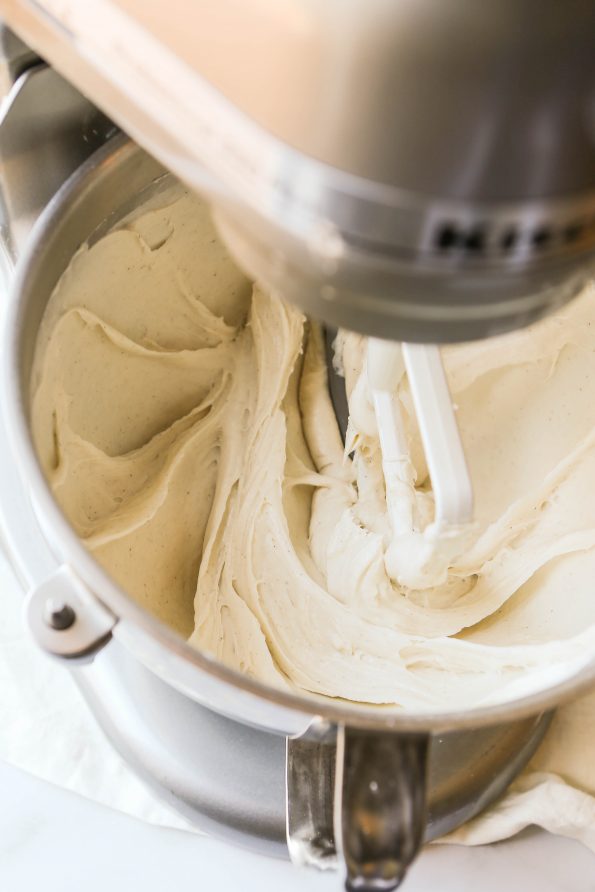
Not all gluten-free yeast dinner rolls are the same. And this dough is not like regular dough. There is no kneading, no bread hook on the mixer, and no double-proofing. The consistency of this gluten-free yeast dinner roll dough is kind of like a thick batter, not a dough.
You’ll want to use a regular paddle attachment on your mixer. And then I scoop this wet mixture out of the bowl with my medium cookie scoop which I love and use for lots of things! Then I cover it tightly and put it in my somewhat warm oven to proof, which is when the yeast has time to release the carbon dioxide to make the dough expand and rise.
Yeast
Yeast is a beast of it’s own. The quality of your yeast can make a big difference. Expired yeast may not bloom and then you’ll waste all this time and energy on rolls that don’t rise. I like to use the Fleischmann’s Active Dry Yeast (not the Instant). Just follow the directions on the back of the package to activate the yeast.
Proofing a yeast dough requires a certain temperature for the yeast to be happy and to grow. You can do a room temperature proof on the counter if the temperature is at 75° Fahrenheit. My house is never that warm. So I do a warmer proof in my oven. I preheat it to the lowest temperature (which is 170° on my oven), turn it off, and let the temperature come down to about 100° before I put the dough in to proof. I do have an oven thermometer I can hang in to make sure it’s warm, but you don’t want it too warm because anything above 115° Fahrenheit can either kill the yeast or you’ll over-proof the dough and then you’ll have rolls with big air pockets.
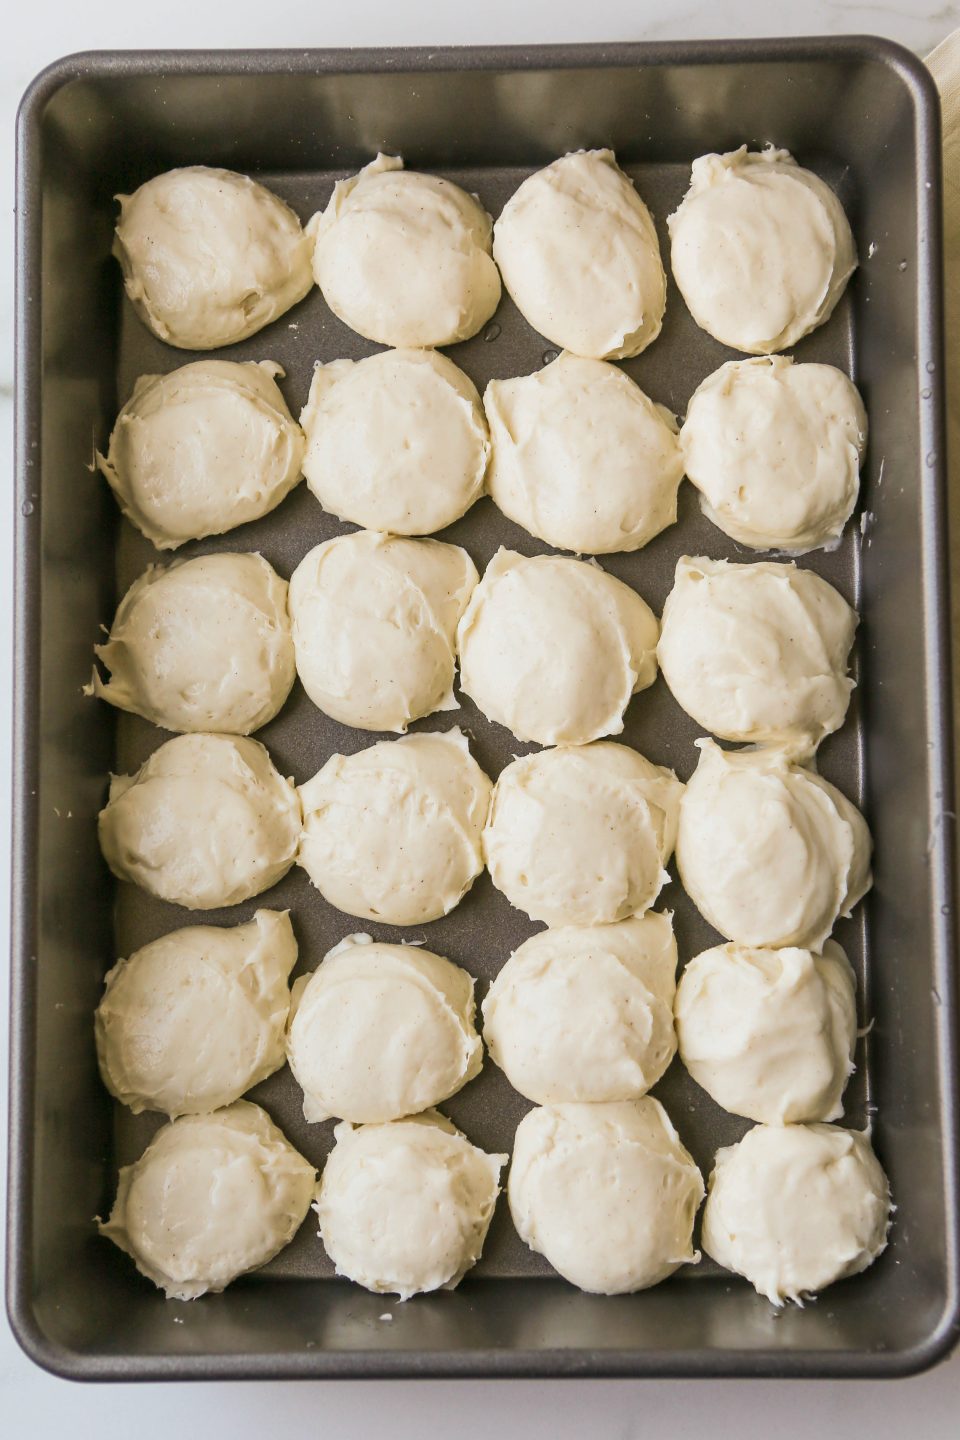
Dough before proofing. 
Dough after proofing.
You can also put it in the cold oven and then put a glass dish on the shelf with about an inch of boiling water. This will keep it nice and warm and moist in the oven.
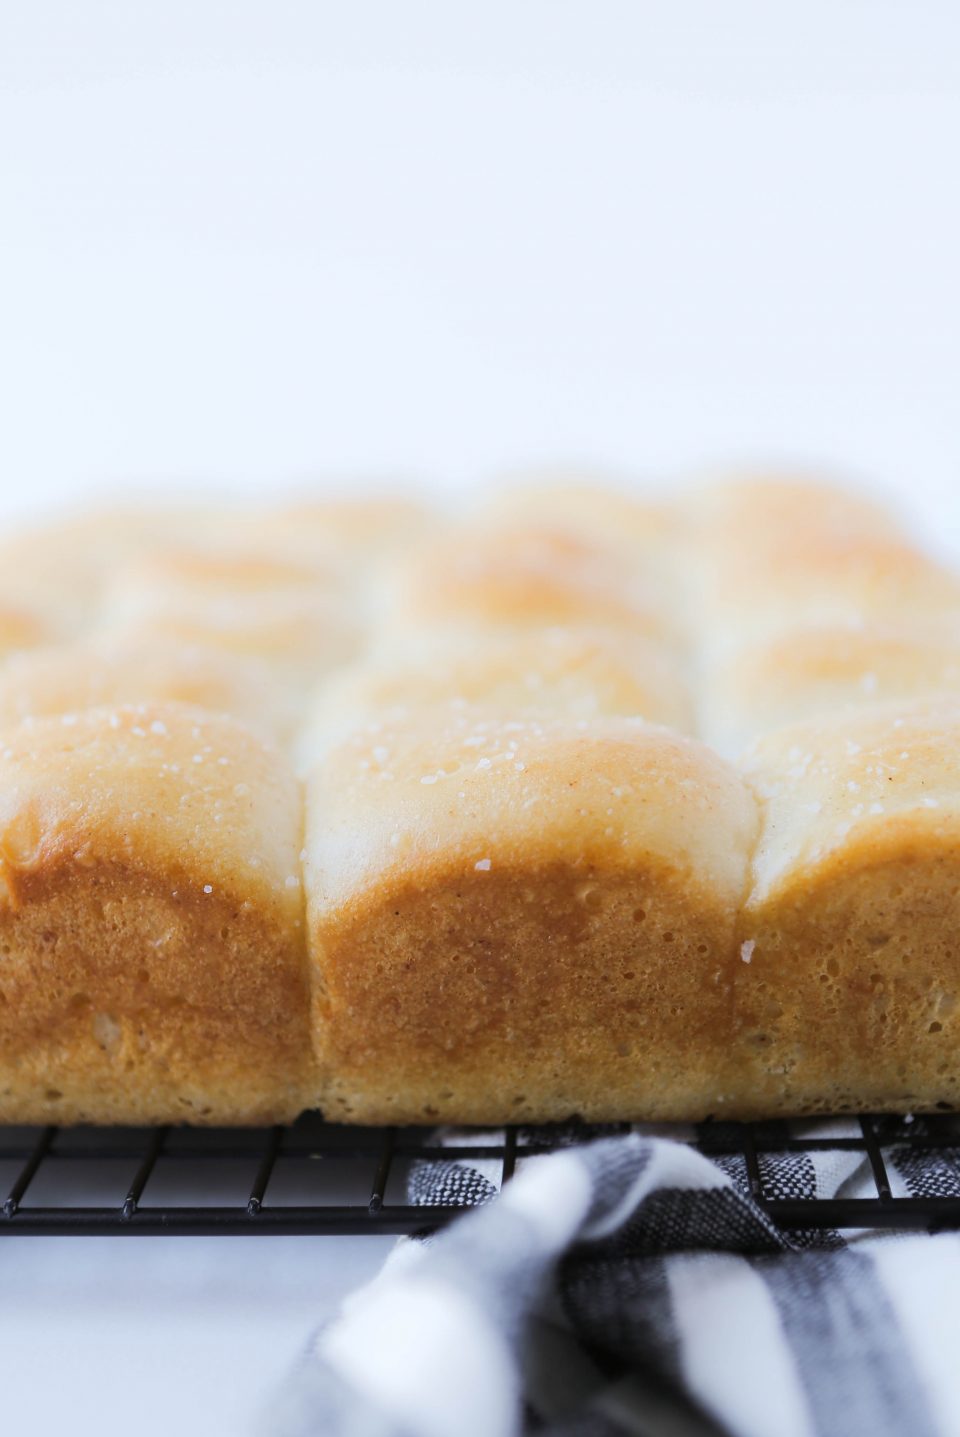
These rolls can be finicky so I will give very detailed instructions in the recipe. I will walk you through it step-by-step and provide some photos of what you are looking for every inch of the way!
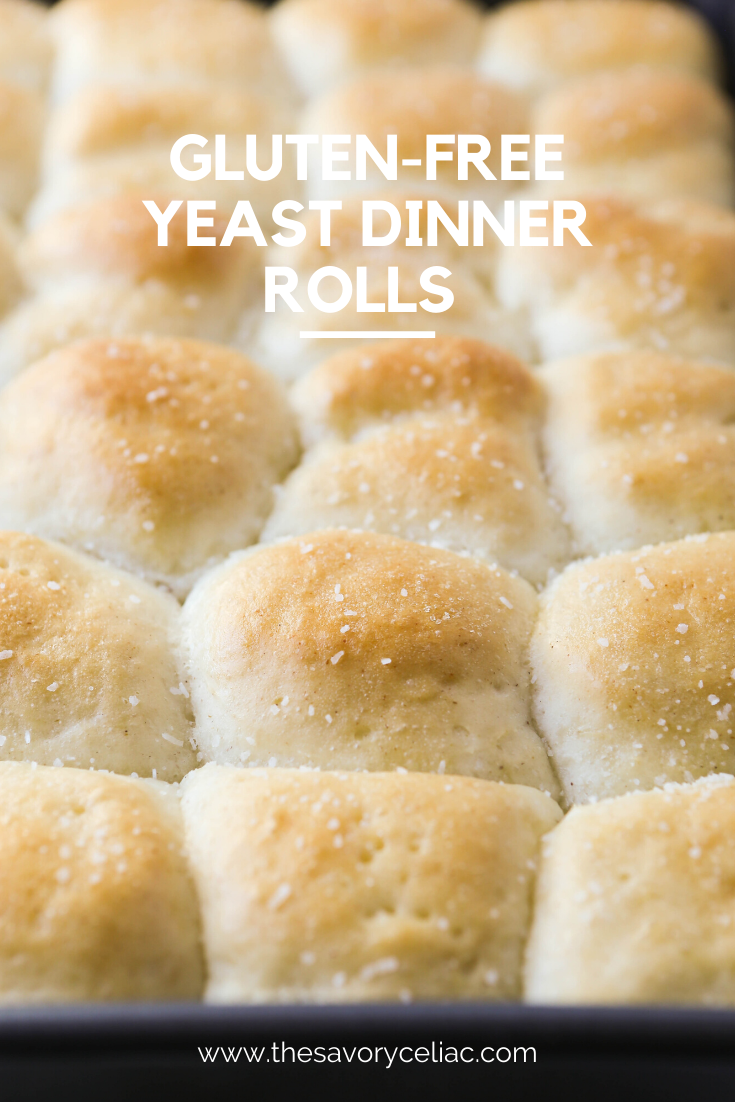
Gluten-Free Yeast Dinner Rolls
Ingredients
For the Rolls
- 455 Grams (3 ½ Cups) Gluten-Free Flour Blend - Like Caputo Fiore Glut (a fine flour blend from Italy that can be purchased on Amazon)
- 75 Grams (6 Tablespoons) Granulated Sugar
- 6 Grams (1 teaspoon) Salt
- 475 Grams (About 2 Cups) Milk - 2% or Whole Milk
- 70 Grams (5 Tablespoons) Butter
- 57 Grams (4 Tablespoons) Extra melted butter for brushing on rolls before and after baking - optional
For the Yeast
- 1 Packet (Equal to 7 Grams) Active Dry Yeast - I prefer to use active dry yeast and not instant (but either one works)
- 60 Grams (¼ Cup) Lukewarm water - Temperature between 110° and 115°
- 3 Grams (½ teaspoon) Granulated Sugar
Instructions
To activate the yeast
- Add the yeast packet and 1/2 teaspoon of sugar to 1/4 cup of the lukewarm water. Use a food thermomenter to make sure that the temperature is between 110° and 115° so that the yeast can activate it. You can kill the yeast if the water is too hot and then your rolls won't rise.
- Let this sit for about 15 minutes, until it "blooms" which means that the yeast comes alive. It will look sort of foamy/fuzzy and it you won't be able to see any yeast granules in the water anymore.
- If the yeast doesn't bloom during this time then your yeast is "dead" and won't work. You'll need to start over.
To create the rest of the dough
- In a mixing bowl, add in the flour, sugar, and salt. Make sure the paddle attachment is on the mixer. To measure the flour correctly for this recipe, I like to scoop it gently into the measuring cup and then level it off. You don't want to dig the measuring cup into the bag of flour because it gets too compacted. Then there will be too much flour in the dough.
- Warm the milk and butter together and check the temperature to get it between 110° and 115° just like you did for the yeast. Use the microwave for this step and check it in 15 second increments until you get to the desired temperature.Pour this into the flour mixture.
- When the yeast is bloomed add that into the mixing bowl. Mix everything together on slow for about a minute so that it starts to combine. Scrape down the sides. Then mix on medium for 3-4 more minutes. I can't stress this enough that you need to let it mix for quite a while so that the flour can absorb all the liquid. You want it smooth with no clumps. It will be a very sticky consistency, but it still needs to hold it's shape (somewhat).
- Warm up your proofing area to get it to about 100° Fahreneheit.
- If you are using a non-stick pan, spray with cooking spray. Scoop the dough into a 9×13 inch baking pan (metal works best – non-stick is even better). You'll want to have 4 rows going across the top and 6 rows going down.

- Wet your fingers and pat down and smooth the tops very gently.
- Cover with plastic wrap and make sure it's tight on the top. Then cover with a towel and place into your proofing area.
- Let these sit for one hour until they have proofed enough to be doubled their original size.

- After they are done proofing, remove them from the oven and then preheat it to 350° Fahrenheit.
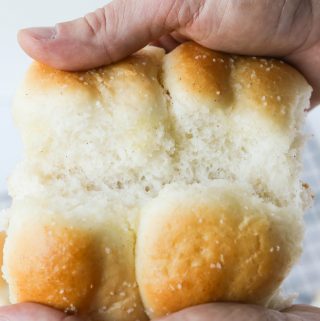
- Remove the plastic wrap from the top of the pan and very gently brush the tops of the dough with melted butter. Put the pan into the preheated oven and bake for 20 minutes. The tops will be golden brown.
- Brush the warm rolls with more melted butter and sprinkle with sea salt. These are best served warm, but they can be stored in an airtight container for a few days and then warmed up in the microwave.
Notes
- This recipe can be cut in half. If you are doing that you’ll want to get a food scale to measure out the yeast just right – you are looking to get 3.5 grams. If you don’t have a food scale, you’ll need to measure out 1 ⅛ teaspoons. Also, these work great in a round cake pan if making only 12 rolls.
As you’ve noticed, there is also a lot of dairy in this recipe. I cannot guarantee that these would turn out if using a dairy-free alternative. But if you do it and it works, please comment below to share your success!
If you’re looking for another recipe using this Caputo Fiore Glut flour then check out my Gluten-Free New York Style Bagels recipe!
Bread
I received a question from a reader if this recipe will work for making a loaf of bread. And YES it does, with just a few modifications.
- Reduce the amount of sugar in the original recipe to 3 Tablespoons. The sweetness in the original recipe is great for the dinner rolls, but it’s too much for regular sandwich bread.
- This recipe makes a decent amount of dough so I used my 10 x5 inch bread pan. If you don’t have a pan that size, then you can just separate the batter in half and use two smaller loaf pans.
- Pour the batter in the bread pan and spread it evenly with a spatula. You don’t need to brush it with melted butter or anything before/after baking. Proof in the oven for one hour just like the rolls.
- Bake at 350° for about 30-35 minutes or until the crust on top is a solid brown color and it sounds hollow if you lightly tap on it.
- Let it cool completely before slicing. You can store it in an airtight container on the counter for a few days or freeze it for later.
Remember to PIN this recipe for gluten-free yeast dinner rolls for future!
**As an added bonus, if anyone is interested to know if I tested this flour with my Nima Gluten Sensor. Yes! I have tested at least 3 of the orders we’ve gotten, both dry flour and the final product, and it has been gluten-free every time!
Could you do this recipe in a cast iron pan instead or a nonstick?
Thanks!
Hi Hannah! I don’t see why not! I would just make sure that the cast iron is seasoned well and/or really greased up!
Hi Kari,
I don’ know how I found your site, but I am so glad I did! I made these rolls yesterday, and OMG, they are delicious and easy! I wanted to use up whole milk I bought for another recipe, and in the future, I will buy whole milk just to make THESE rolls! I had the Caputo flour on hand already. So, my son and his girlfriend were coming over for dinner. I had sent Austin a picture of the rolls, earlier, both before and after baking (I made them earlier because I was already heating the oven for something else). They were excited for the homemade rolls, and tasted them right when they arrived-and loved them, and they were not even warm at all. They didn’t know they were gluten free, and I didn’t tell until later during dinner when they and my hubby were raving about them! These were super easy and forgiving. I used a big cookie scoop, and it did not make as many rolls- 15. They were indeed wetter than yours, as others have said, and I also weighed all ingredients! It didn’t matter at all, the rolls all joined in the pan, but baked up light brown on top, and a beautiful white, fluffy interior! I looked up what temperature yeast rolls need to be to be done, and it said 190-200 degrees online, so even the middle ones barely made that- but I am SO glad I took them out after the 20 minutes, as all were PERFECT! I will make these again and again! They are just as fresh today- on day #2, also. Thank you for this recipe!
These turned out Soo amazing. My grandkids love them. I have to make them twice a week. I wish I could post a pic because they look exactly like the recipe. Luv luv luv
Someone else commented saying that they had tried making these with the Namaste flour blend and they had turned out pale and gummy, but I still tried using the Namaste flour blend anyways. They turned out very pale and very gummy. I tried putting them in the oven for another five minutes but nothing really changed. I am sure with the right flour blend these would have been great and I am taking full responsibility for not using the highly recommended blend haha. Just wanted to add another comment warning anyone else thinking about using the Namaste blend!
I know how frustrating it is to go through all that work and use up ingredients and then it’s a total fail. Happens to me all the time. 😉 Thanks for sharing your experience, Lauren!
Blown away! Thank you for sharing this recipe. It was a revelation! I was lucky to find the Caputo flour at my favourite local Italian shop and it will now be a staple in our kitchen. Can’t wait to try other recipes. But really, there’s so much you can do with this humble bun. It will open a whole new world of sandwiches, burgers, dogs, and just plain bready goodness that has been absent from our house for so long.
The best rolls ever according to 4 celiac grandkids and my daughter who is also has celiac disease
I can’t have yeast what would the amount of sourdough starter be for this.
Hi Emanda! I’m sorry, I don’t know the answer to that question. I am not familiar with conversions for yeast to sourdough starters. I just did a quick google search and I found that is article that might be helpful for you: https://www.healthline.com/nutrition/yeast-substitute. It says this – “You can use 1 cup (300 grams) of sourdough starter to replace one 2-teaspoon package of yeast. If your starter is thick, reduce the amount of flour in the recipe, and if your starter is thin, either reduce the amount of liquid or increase the amount of flour to achieve the correct texture.”
Sorry I can’t be more help.
We have an Ooni pizza oven, and I’ve been using Fioreglut to make pizza crusts for it (the recipe on Ooni’s site is AMAZING). The family has successfully converted over to using it exclusively, so I was wondering if there was a dinner roll recipe that could be made with it. Low and behold, you do! The only dinner rolls on the table at Thanksgiving and Christmas were these rolls. The family had no clue they were gluten and dairy free! I used Country Crock Plant Butter and Califia Farms Unsweetened Oat Milk to make them dairy free. It did take a few extra minutes to bake, but I cooked them until the internal temperature was 200 degrees and they were perfect. Thanks for a great recipe. I’m following the other commenters’ suggestions to make hamburger rolls out of them and have a batch rising right now.
I LOVE to hear that no one could tell the difference and these were a hit at your holiday tables!! Thanks for sharing your experience with making them dairy free!
So I previously commented that the recipe required quite a bit more flour than was in the instructions.
I figured out why! When I tried recipe the first time, I changed the servings to: 12 rolls. The recipe changed the amount of grams, but where you had in parenthesis, the number of cups–that did not adjust. It said for 12 rolls, 227.5 grams (3 1/2 cups) When I went to make 24 rolls, it said 455 grams (3 1/2 cups)–that’s where the problem lies, it only changes the grams not any of the other measurements. My suggestion to others wanting to change serving size, is DON”T change the serving size from The Savory Celiac. Adjust it on your own:) This recipe was AMAZING!!!
Hi Ellen! THANK YOU so much for sharing that discrepancy on the web page. I am going update it (first, I’ll have to figure out what is going wrong). But thanks for sharing it with others so they don’t have to discover it on their own like you did. I am so sorry. Again, thank you! And I’m really happy they worked out better the second time!
WOW, incredible. I made these for a relative who can’t eat gluten for Christmas dinner. I only made 1/4 of the recipe, which made (4) 3TBSP scoops. I baked them in ramekins and my relative said they were phenomenal. My grandmother (who isn’t GF) tried one and said they were good too. Will be returning to this one the next time I need GF rolls. SO so easy too.
Hi Laura! Wonderful to hear! I am so glad you were able to figure out how to quarter the recipe and that it worked out so well for you and your family. Thanks for sharing your experience!
I’m so grateful to have found this recipe. The Caputo flour is amazing. I don’t see too many comments making them dairy free, so I wanted to share our successful,results with that venture. I used oat milk in substitute for the regular milk and earth balance butter for the regular butter. Also, I only had SAF instant yeast on hand and used that. The results are phenomenal and people who aren’t GF and DF can’t tell these are a special diet. Thank you for giving us back a family favorite. These will be a regular in my house. I’ve made them 3 times in the last month.
I searched for other recipes hopeful to find a cinnamon roll recipe to bring that tradition back into our family. I found one using the Caputo flour on wheatbythewayside.com. It also did not disappoint.
THANK YOU
Hi Lois! Thanks so much for sharing your experience using oat milk and non-dairy butter. I am so glad these were a hit with everyone…and you! Also, thanks for sharing where to find a good cinnamon roll recipe – I’ll check it out. Happy Holidays!
I have tried lots of recipes for GF rolls and purchased all the suggested flours… I bought the Caputo flour and was determined to follow your instructions precisely, I made sure and checked the temp before I added my liquids. They were amazing!!! The dough was definitely wetter than yours and I let it go for a while, I just added more flour until mine looked like your picture:)
Really an easy recipe and sooo good! Thanks for sharing ❤️
Thank you so much for sharing, Ellen! I am so glad you enjoyed them. Happy Holidays!
I think I commented earlier but no reply. I loved the dinner rolls! Ate 6 the first day! I made them with portable mixer (all I have) using their dough hooks but don’t look like what you used. Mine didn’t get as thick or hold their shape as well as yours. I bought a hamburger pan. It has 6 holes and I thought I’d make half the recipe, or make a full recipe and make a small pan of rolls. I’d use hamburger buns more than dinner rolls. Probably should have bought two hamburger pans! Wish me luck. I love that rolls don’t fall apart!
Hi Julia! I’m so sorry that you didn’t get a reply. I try my hardest to respond to each person in a timely manner so I don’t know how it was missed. I appreciate every single comment, good and bad. Thanks for sharing that you loved these. I can’t wait to hear how your hamburger buns turn out – please keep me updated!
Thank you so much for sharing! My son eats GF, I tried so many recipes along the years, this is the best one!
I would like to make it as buns so he can take it to school, Do you have any tips how to store it after baking?
Thanks!
I’m so glad you found that these work great for you and your son! My thoughts are to bake them fully and then freeze them in an airtight bag or container and take them out as needed. I think it’s best to freeze them soon after baking (letting them cool completely first) so that they don’t dry out at all. I hope this helps!
Thanks!
Thank you for this wonderful recipe! This flour s amazing, and your recipe work so well with it. I’ve had silent Celiac for at least 10 years so when it was finally diagnosed I had a lot of damage in my intestine. There’s a lot of good food that you can buy out there, but the one thing that seemed to be lacking the most was hamburger and hot dog buns. Very expensive and not very good. So my search for gluten-free bread recipes has been towards making hamburger buns. Finally, something that works beautifully!
For humburger buns, I use a large cookie scoop and plop the dough onto parchment paper sheets. {Hamburger buns made with this recipe toast up nicely which is one reason my husband loves them. I offered to make some with regular flour and my husband doesn’t want any part of it!)
In addition to reducing the sugar in the recipe for hamburger buns I have a couple other tips. Because I don’t have a large stand mixer I decided to use my bread machine as a mixer for this dough. It works out perfectly! I add the dry ingredients, let it mix a little bit, and then I add the warm ingredients and the yeast mixture and I just run a spatula along the sides of the pan to encourage the mixing.
The other tip I have is that I put the empty bread pan on the digital scale and zero it. Press the power button with the pan on it and this equals 0. Then, I just pour the flour into the pan to measure the gram weight. That way you don’t have to worry about measuring the flour in a measuring cup because it is a little messy. It’s so light!
I would say anybody who’s going to be baking their own breads etc with the Caputo flour should invest in a digital scale.
Thank you again for this wonderful recipe! I’ve not tried it with oat milk but after the holidays I probably will in order to give it broader appeal at social functions..
Thanks so much for sharing, Sherrie! I appreciate you sharing all of your awesome tips. Please me know how it works out when you try it with oat milk!
I wish there were more stars available for me to rate this recipe! I can’t thank you enough for putting this recipe out there! It is amazing!! I’ve been GF for over 10 years and I have never had a recipe rise like this one. The rolls truly do not taste GF! They are light, soft and airy. No heavy grainy taste. I had my husband, who is not GF, taste them and he said,”These are freaking awesome!” I followed the recipe exactly, but I did add 1/2 cup additional flour. I also used the broiler for about 1 minute to help them brown. I can’t wait to try this dough for cinnamon rolls! I am Celiac and I did not have any reaction except for being excited.
What a great comment, Susan! I am so so glad the rolls were delicious for you. Thanks for sharing your tips and tricks – I’ll have to try it under the broiler for a minute next time!
I made these in my daughter’s oven and they browned beautifully. I think it might just be my oven.
Yes, ovens are all so different. I did recently buy an oven thermometer and I’ve found it takes about 20 extra minutes of preheating to get to the actual temperature I’m looking for.
Hi Kari,
I love the gluten-free Caputo flour, and I am excited to try this recipe. My question is can I make and freeze the dough? I want to meal prep as much as I can before Thanksgiving. Thank you for sharing your recipes and wonderful directions. Best, Debbie
Hi Debbie! Sorry I didn’t get back to you sooner. I haven’t tried to freeze the dough, but my first thought would be no that won’t work. I would suggest to bake the rolls and freeze them already baked (I have tried this before and it works). Then just take them out the night before Thanksgiving to thaw. But be sure to freeze them soon after they cool so they don’t dry out too much and keep them covered in a sealed ziplock or something while in the freezer. Hope this helps a little at least. 😉 Take care!
I bought the recommended flour and made these last night, following the instructions exactly (including weighing ingredients). My yeast was beautifully alive. The only difference is that because I am still new in my celiac diagnosis and don’t have regrowth of my villi to help me process lactose yet, so I used lactose free milk and vegan butter.
When I was scooping the balls of dough into my pan, I noticed my consistency was more liquidy than the pictures here. The balls flattened on their own, running into each other a little bit, and I did not need to flatten them with a wet finger. However, I had extra dough, so I tried doing what I used to do when I would bake breads, adding more flour if the dough seemed wet. I added flour until my consistency looked more like the pictures here, and made a small pan of another five or six rolls.
After rising, neither pan looked like the dough balls had maintained as much individual integrity as the pictured ones here. The liquidy ones were pretty flat, and I could see lines where they were separated before, but not a lot of differentiation. The ones that I had added flour to, however, had a bit more shape and were rounder on top, though overall did not rise as much.
I baked them for 20 minutes, and they came out looking completely white (pale!). I added butter and let them bake for another three minutes, then I turned up the oven to broil and let them get more golden on top (the sides did not become golden).
The texture was a little off on both batches, but less so with the ones to which I had added more flour. Those ones also came apart a little more easily as individual rolls and had no problem with lost bottoms sticking to the pan.
Both needed a good sprinkling of salt on top, and ended up reminding me of a pretzel as I ate them. The flavor of the ones to which I added extra flour was preferable, as the ones that had started out more liquidy tasted more doughy even though they were fully cooked through.
Neither had a classic dinner roll flavor, but for now I am blaming that on my milk and vegan butter because the taste was something like the smell of the milk and butter melting together, which was not the pleasant smell of your normal milk and butter melting together. I may wait until my villi is healed and I can (hopefully) tolerate lactose again before I try this again.
Thanks for sharing your experience using the lactose free milk and vegan butter. I definitely think that the fat content in the vegan butter could have something to do with the absorption of the liquid in this recipe and, in turn, the texture of the finished dough. Also, I have this noted in the directions that it is important to let the dough mix for quite a while to make sure everything is absorbed nicely. But again I would think the vegan butter threw this one off for you. I hope that you have quick healing and are able to try this one again soon!
Can I substitute buttermilk for the milk? Seems like it would be more rich, plus have that great taste.
I don’t see why not! The fat content in the buttermilk will be a little different (so just be aware it could affect the texture/density, but I think it would be fine) and I wholeheartedly agree it would add amazing flavor. If you do give it a try, I’d love to know how it turns out!
Hi! While I would love to experiment with this flour ,I am afraid that I can’t find it on Amazon bc it says that the item is currently unavailable and I can only get it in enormous bulk and there are only 14 of those left in stock. Where else besides Amazon can I purchase this flour? Thank you!
Hi Zee! I am sorry you are having trouble finding it on Amazon. I can see that the single 2.2 pound bags are available when I go out there. Do you see it on this link – https://amzn.to/2XNM9V4?
Here are a couple other websites you can purchase from-
Olio2Go
Yummy Bazaar
Supermarket Italy
Hopefully one of these will work for you!
Kari
Kari, I made these rolls but for hotdog and hamburger rolls. I bought the hamburger bun pans and used 1 1/2 large scoops for each well. For the hotdogs I used a biscotti pan. They all came out perfect. I’m going to try adding cheddar and Parmesan to the batter for hamburger rolls this time.
Thank you for experimenting with this wonderful flour.
I forgot to add I only used half the sugar fir the hamburger and hotdog buns.
Awesome! Thanks for sharing, Jeanne! Can’t wait to hear how they turn out when you add some parmesan to the batter. 😉
Hi Kari,
The cheeses kind of disappeared as far as flavor. I guess 1/2 cup of Parmesan and cheddar wasn’t enough but I’m afraid to add too much.
Oh bummer. And did you use shredded parmesan? I wonder if you tried to use grated parmesan instead? That might blend in with the dough a little better so you can use more that way. And maybe brush with butter and sprinkle some more grated part on top when they are hot out of the oven?
I’m a professional chef of 18 years, and I’m also gluten free for 3 years. I’m always looking for new recipes, not only for my gluten free clients but for myself. I’ve often removed the gluten from my clients diets without them knowing it – and they will tell me how “healthy” my food makes them feel. 🙂 lol This recipe is awesome and it works perfectly, just as written. This is a sweeter tasting dough, but thats in alignment with dinner rolls. I love following Caputo’s recipe for Foccacia, but the dinner rolls are great to freeze individually – and that makes a batch last a long time. Thank you for literally a PERFECT dinner roll recipe. 🙂
Hi Heather! Thank you so incredibly much for this amazing compliment. Wow! Nothing makes me happier than to hear that people have success with my recipes. 😊
These are glorious. They are as good as the glutinous type rolls. I made rolls and sandwich buns out of the last batch. Thanks so much for the recipe.
Thank you so much for sharing this great compliment and your love of this recipe!! Makes me so happy to hear!
I made these buns this am with the Caputo Gluten free flour and oat milk since I have a dairy intolerance. I think that the dough was just a little looser than yours were so I chose to put them in muffin tins. I halved the recipe and instead of making 12 smaller buns I made 7 large buns. Next time I’d make them a little smaller and get more buns. I ended up baking them for 25 min because they were so much bigger. They were delicious! Game changer for me. I’ve struggled with gf/df bread. I will be making these often. Thank you.
Thank you for sharing this, Mary! I’m so, so glad you enjoyed them. 😉
These are amazing. Do you think I can put the raised dough in the refrigerator overnight and bake in the morning? If so bake from cold? Any ideas?
Thanks!
Hi Jolanta! I would actually put the dough in the fridge before it has risen. Then in the morning take it out, let it come to room temperature and then let it do the rise like normal. That has been successful in the past with my pizza dough!
Hi! I tried this by halfing it because I didn’t have enough of the Caputo blend to do a full batch. I was careful with my measurements, but it was still pretty liquid (I’ve made lots of GF rolls before so I know they need to be sticky, but not this liquidy). Do you happen to know the grams of the flour? I’m hoping that will help me.be more exact. Thanks!
Hi Audrey! Thanks so much for your message. I re-made the recipe yesterday, measured everything out using grams, and updated the recipe to include metric conversions. They are listed out for the full recipe and not the halved version, but I hope that is helpful for you in the future. The recipe does seem very liquid-y at first and it will come together better after mixing for a few minutes. Let me know if you have any other questions! Kari
Thank you so much! I am excited to try them again. Even though they were liquidy and didn’t rise as high as yours, they were still so good! I will definitely be coming back to this recipe.
Are you sure the milk grams weigh 215 g for 2 cups?
215 grams weights one cup of milk
If I use 215 grams it does look like your dough – mine are rising now so we will see
please let me know the weight of the milk – 1 cup worth or 2 cup worth with 455 grams fioreglut
Hi Jolanta! I made an error in my measurements (I just updated the recipe last week with the grams conversion so you’re the first one who has run into this issue). I am so sorry. It should be 2 cups of milk. I just weighed it out and it should be closer to 475 grams of milk. I reviewed my notes and have no idea what I was writing down, but I made a mistake. Can you please send me an email at kari@thesavoryceliac with your mailing address – I’d like to send you a bag of Fioreglut to make up for this. Thank you for letting me know!
Thank you for the update! I will try again tomorrow. I will email you.
OMG these are the best rolls ever!!! I’ve been searching, practicing, doing what I can with the Caputo GF and this by far is the BEST! How would you make baguettes with this? Thank you so much for sharing this recipe! Can’t wait to try the bagels and cream puffs!
Hi Helen!! I am so glad you loved these rolls! I working on a baguette recipe and also a French bread recipe. It’s taking lots of trial and error to get those right!
My son has celiacs and he devours these in a couple of days. I just used a flour blend from Winco so they aren’t light and fluffy as the picture showes. They are fairly easy to make, I’ve made these a few times now and will continue to use this recipe.
Thanks for sharing your success with this recipe, Erin! I am so glad your son can enjoy these!!
Just wanted to report back at how awesome this recipe is, specifically with Caputo Fiore Glut flour. I followed the recipe exactly. Even used silicone hot pads to place my warmed ingredients on so they would not cool down too fast. I was so amazed at how fluffy the rolls were. The recipe was difficult as the rolls wanted to reconnect to each other as they were raising but the end product was crazy good, crazy like gluten rolls & they separated from each other without a problem. I have one request please, I would love to get baking measurements in weight – it often takes recipes to the next level. Thank you so much for the recipe. I am now searching your site for more recipes using this flour & your expertise!
Hi Lisa!! Thank you so much for your very thoughtful review and helpful suggestions!! I have taken a big break from my blog this year but I am hoping to get back into it more consistently now; going forward and I am going to be more cognizant that measurements in weight are requested and better for my readers from all over. I appreciate you sharing that with me. AND, I am absolutely thrilled to hear that you loved this recipe as much as I do. I couldn’t be happier to hear they reminded you of regular ol’ gluten rolls! Happy New Year to you!
I have a lot of GFJules all purpose flour. It is also finely ground – not gritty at all. Have you ever tried this recipe using that flour? I don’t believe her flour has wheat starch in it though.
I haven’t tried this recipe with her flour, but I have no doubt that it will still work great! They may just turn out a tad bit denser than these using the Caputo flour. If you do try it, please report back – I’d love to hear how it is!
I made these for thanksgiving yesterday and they were the hit of the day! A lot of happy GF folks in my home 🙂 Thank you!! Any thoughts on making these into a cinnamon roll? My kiddos are dying for a good one and I think this flour could be the answer?!
Hi Shauna!! I am SO glad to hear these were a hit on Thanksgiving!! I haven’t tried making cinnamon rolls with this dough, but I agree that this flour would work great. I think this recipe could be a good place to start: https://iowagirleats.com/gluten-free-cinnamon-rolls-recipe/. I’ve found the Caputo flour is much finer than other flours so you might need to add a little extra to the dough batter to get it the right consistency and not too sticky. If the dough does seem too sticky at first, start with adding just a couple tablespoons of flour at a time until it looks like the dough in Kristin’s recipe. Please let me know if you make them and how they turn out!!
Hi! I tried Kristen’s recipe out using the Caputo flour and they came out amazing! I ended up using 9 extra TBSP which may have been a couple too many but they still turned out delish! My children declared them better than real cinnamon rolls! They were not difficult and well worth the rise times!
Thank you so much for sharing your results, Shauna!! I mean, who doesn’t love a good cinnamon roll?! 😉
I LOVE iowagirleats and she is one of my “go to” sites for recipes. For cinnamon rolls, I stumbled across this website and although they take a lot of effort, they are by far the best cinnamon rolls I’ve made. https://www.letthemeatgfcake.com/ultimate-gluten-free-cinnamon-rolls/
Thank you very much for this great recipe! I love this flour and I look forward to more recipes to use it. My rolls turned out to be amazingly like regular rolls. My husband loves them. We are having them with our Thanksgiving meal today.. I used skim milk and did not salt them. I might try your bagel recipe next since I have some time off work this weekend. 🙂
Hi Marene! I am so glad to hear that your rolls turned out delicious. They will be a great addition to your turkey day meal! Happy Thanksgiving to you and can’t wait to hear what you think about the bagels!
Hi There! I just bought some of the Caputo gluten free flour blend and am pretty excited to try this recipe out. This is probably a dumb question but, what did you use to scoop the mix into the pan to get the little balls? I haven’t tried making it yet but, I’ve always found that gluten free dough is so sticky is almost impossible to work with!
Cheers
Hi Jered! Not a dumb question – you’re right that GF dough is usually really sticky and this recipe is definitely that way! That’s what keeps them so light and fluffy. I did mention in the blog post that I use a medium cookie scooper (but this was a long blog post and it was maybe a bit hidden in there). If you don’t have a cookie scoop then use 2 spoons to kind of make a round ball form. Then you can wet your fingers once it’s scooped into the pan and form them a little more. Do leave a little bit of space between each dough ball so that when it rises, you can get a good shape to the rolls. Let me know if you have more questions. And enjoy!
HI there! I too have been using the caputo gf for a while for my pizzas. I discovered it at the Detroit airport on my way back from a trip to Mexico. They offered a homemade gf pizza in their pizza oven and I was so blow away by it, I didn’t believe it was gf. I went and chatted with the chef and he showed me the bag of flour they use for starter and I took a photo and found it on amazon. We too have the Ooni pizza oven, because of this flour! I have been experimenting with baguettes using a recipe that is halfway between the pizza recipe and the focaccia recipe for hydration. It works great but never browns as much as I would like. I should try baking them in the Ooni. I have made a few boules too with the same dough. I am excited to find your recipe for rolls and bagels, as I have been thinking this dough would be excellent for bagels. I do want to try a sourdough version and really let it sit in the fridge for several days before baking. I am want to make a nice crusty European style loaf for some grilled cheese.
I am so glad to find someone else experimenting with this flour and loving it!
Hi Ginger!! I am so glad to hear that you like the Caputo flour, too. I’ve been hearing from lots of people that they really feel like this flour helps them to replicate their favorite gluten-filled foods. I did respond to your other comment about my cream puffs, but wanted to make sure you saw it. Here is the link to the cream puff recipe: https://thesavoryceliac.com/gluten-free-cream-puffs-with-whipped-cream-filling. Thanks for sharing your love of Caputo with me!
The rolls are in the oven baking as i type, they smell and look great . i needed to use more flour to get the texture in your photo, thank you for posting that photo. It’s really dry in our house right now. I forgot to mention that i’ve used the caputo gf flour twice to make German style pretzels and pretzel rolls using lye.and the NYTimes recipe, straight cup for cup substitution.
Hi Ginger!! Hope you loved the rolls! I am glad the photos were helpful for you and I will DEFINITELY need to try out that pretzel recipe fro NYTimes. Thanks for the great tip!
I have found some recipes use potato flakes to help the rolls brown, they only use a tablespoon or two.
Thanks for sharing that great tip, Lisa!
Can we use this for sourdough bread rolls? I would love to try that!
Oh, I’m sure you can! I haven’t tried it myself yet, but I don’t see any reason why it wouldn’t work. Please let me know how it turns out if you try it!
Yes it works but I think have to reduce the milk by half with 1 cup of starter instead! I had to add more flour. However it looked like a large cake vs individual bread buns
Loved the recipe and just wanted to leave a comment that I tried this recipe with almond milk and it worked!
I am looking forward to trying more of your recipes with this flour.
Wonderful, I am so glad to hear it worked with almond milk!! Thank you for sharing!
I know you Are the savory celiac Backer. I amItalian
And I just love Caputo gf
I was wondering if I can bake cakes and muffins and cookies with this flour. I am sure you would know!
Thank you
Carla
Thanks so much
Hi there!! Thanks so much for reaching out all the way from Italy!! I <3 Italy! I don't have a ton of experience using this flour for things other than breads. My first instinct is that it will work just fine...but you will most likely need to add more flour to whatever recipe you're following because the consistency of the flour is so fine. I would suggest that you would need to add an extra ½ cup to ¾ cup more flour. If you want to try it yourself, I would probably start with a recipe you're familiar with, like chocolate chip cookies or something like that. Then you can know what the consistency of the batter is supposed to be like and add more flour until you get to the right density. Sorry I can't be more help at the moment. Thanks again for your note!!
I just ordered this flour based on the recipe for gf pizza crust in The Elements of Pizza & now I’m excited to try your rolls and bagels. Do you have any idea what the “flavoring” is (listed in ingredients)? I’m trying to track it down as I’d like to gift some of the flour to a friend.
Hi Gina!! I am so sorry I didn’t see your comment until now; my apologies for the delay in responding. I am unsure what the flavoring is in this flour. I tried to search online, but didn’t see anything. Caputo does mention a lot about “proprietary” ingredients on their website so I don’t know if they would be willing to share it. 😉 I sent an email to them so I can let you know if/what I hear back!
You’re so kind—thanks for taking time to read my comment & reply. I’ve been baking gf for a good ten years & sort of plateaued for awhile (same old, same old). Excited to get excited again with your blog!
I was just gifted the Caputo blend to make these and am wondering if you measure your flour by scooping it out of the bag and then leveling it off, or spooning it into the measuring cup and then leveling it. Many GF recipes specify that the flour needs to be spooned instead of scooping it with the cup like you would with all-purpose wheat flour. I look forward to making this as soon as I get some yeast!
I was in such a hurry I didn’t read the full recipe. You specified your measuring technique in the instructions! That’s what I get for doing this late at night. 🙂 I’ll let you know how these turn out! Thanks!
Haha, that’s funny! That’s sounds like something I would do! I try to be very detailed in my instructions because I know how it feels to put so much work in to a GF recipe and then it not turn out. I hope you enjoy these rolls and can’t wait to hear how you like them!
I tried this recipe and they turned out flat and gummy inside. Everything seemed to be going fine until the baking. After twenty minutes they were still very pale. Any idea where I might have gone wrong? I used Namaste gluten free four blend. My yeast seemed fine, so I don’t think that was the issue, and I’ve made other successful yeast recipes with the same yeast. Could it be the flour blend? Or an oven temperature issue? I set the oven to 350, but I don’t have an oven thermometer, so I’m not positive how accurate it is.
Oh bummer, I’m so sorry to hear that Megan. I have not tried to make these using Namaste, but I did make them once with Cup4Cup (which is very similar to Namaste ingredient wise). They did turn out slightly flatter and denser than using the Caputo flour I typically use and talk about in the blog post, but I’ve honestly never had these turn out gummy. Did your dough seem really heavy and thick? The consistency of regular 1:1 flours can be heavy compared to the Caputo so you could try a little less flour in the batter. Did your rolls rise to double in size before baking?
I definitely think you could trust your gut and cook them longer if you don’t think the color at 20 minutes looks like they are done. They should have a little bit of golden brown color to them. If you every want me to walk you through it in real time, feel free to email me at kari@thesavoryceliac.com and I’d be happy to do that!
Thank you for this fantastic recipe. I have made it 3 times and it is great every time. I am looking forward to more recipes using the GF Caputo flour.
Hi Nancy!! Thank you so much for sharing that with me – I’m thrilled to hear that you like this recipe. 😉 I am working on more Caputo GF flour recipes for you!
These are SO GOOD! i am so excited to try the bagels! I have made both the rolls and the loaf of bread. A donut repine with this flour would be AWESOME!! Thanks for your recipes!!
Allison, I am so so happy you enjoyed these rolls!! I agree that donuts would be perfect with this flour. I’m going to attempt a cream puff this weekend so I’ll be sure to let you know how that goes!!
Yum!! How were they? So, when I make my tolls, the dough kind of flattens when I scoop it out, and they still rise and get fluffy and are delicious, but they kind of meld together, and you can’t see the lines of where each roll is super well. Does that make sense? I would add a picture, but don’t see how to. Do you know why it might be doing this? It’s happened more than once. Does my dough need more flour? Should I bear the dough longer?
Hi Allison, I have a couple thoughts on why the rolls might be getting too big and you can’t see where each one starts and ends. First, you can try to separate them farther apart before proofing. Also, they. might be over-proofing. You could maybe try to proof them for a little less time. Or at a lower temperature. Sometimes when they proof too warm or too fast they kind of blow up really big and fast with big air pockets. Those are just my initial thoughts. Sorry I don’t have the ability to add photos in the comments here, but if you want to send me an email at kari@thesavoryceliac.com we can talk through it there, too!
The cream puffs turned out absolutely amazing!!! I’ll post them soon!
My dough. Was just liquid, I poured in a bread pan.
I tried adding more flour and ran out of it before it got thicker.
Not a favourite.
Hi, Eve! I’m sorry to hear these didn’t work out for you – it sounds like your measurements were off.
Hi Kari,
Your recipe doesn’t need xanthan gum? Because all gluten free recipes call for xanthan gum if I remember correctly!
Can I also bake the dinner roll in 6 cup muffin pan? I don’t have a big bake pan like yours. Thank you!
Hi Shirley!! Actually if you are using a 1-to-1 gluten-free flour blend (like Bob’s Red Mill 1-to-1 or Cup4Cup or this Caputo Fiore Glut that I used in this recipe) they already include xanthan gum so then you don’t need to add extra. Now, if you’re mixing your own flour blend from scratch then you’d definitely need to add it. But don’t add extra if you’re using a packaged flour blend that already has it!! I definitely think you can try to make it in the 6 cup muffin pan – that would make a great shape. Let me know how they turn out!
I just tried this recipe and they turned out AWESOME! Thank you for the recipe and your detailed instructions. I only had rapid rise yeast, so looked up how to substitute that for the active dry yeast (1 3/4 tsp instead of the normal full package). These were beautiful, springy, and unbelievably tasty. Thank you again!
Hi Steve! I’m thrilled you tried them and they turned out so well for you. I am going to start working on some more recipes using the Caputo flour because these seem to be a hit with people! Thanks again for your comment!
Awesome recipe! Thank you so much for sharing the recipe, which is amazing!!!! I have also experimented in adapting recipes for at least 10 years since the household is Celiac, or gluten free. I love the Caputo flour, it also makes nice cream puffs. You are an angel for sharing this recipe. The rolls toast nicely and make great breakfast egg “McMuffins” which I make using the microwave, and then add cheese and ham.
Hi Robyn! Thank you so much for sharing this note with me. I am so glad you like the recipe. McMuffins is a GREAT idea with these! Yum!
Would you be willing to share your cream puff recipe?
Hi Ginger! I just uploaded my recipe for cream puffs to my blog. Here is the link: https://thesavoryceliac.com/gluten-free-cream-puffs-with-whipped-cream-filling
Can this recipe be used for bread?
Hi Michael!! Thanks for the question. Yes, it can be used to make bread with just a few slight modifications. I updated the blog post with the information toward the bottom of the article. Here are the instructions I included to make bread:
1. Reduce the amount of sugar in the original recipe to 3 Tablespoons. The sweetness in the original recipe is great for the dinner rolls, but it’s too much for regular sandwich bread.
2. This recipe makes a decent amount of dough so I used my 10 x5 inch bread pan. If you don’t have a pan that size, then you can just separate the batter in half and use two smaller loaf pans.
3. Pour the batter in the bread pan and spread it evenly with a spatula. You don’t need to brush it with melted butter or anything before/after baking. Proof in the oven for one hour just like the rolls.
4. Bake at 350° for about 30-35 minutes or until the crust on top is a solid brown color and it sounds hollow if you lightly tap on it.
5. Let it cool completely before slicing. You can store it in an airtight container on the counter for a few days or freeze it for later.
Let me know if you have any other questions!
Thanks!
Do you have any other recipes using Caputo flour? I just bought some & am eager to start using it, but I’m having a very hard time finding recipes in English!!
Hi Diane!! I don’t have any other recipes yet, but I am working on GF Pizza Hut breadsticks using it so I’ll let you know when that one is all done! I also tried cinnamon rolls one time, but the dough wasn’t quite right so I need to keep working on it. My husband uses the recipe on the bag for pizza dough and it turns out perfect. We do have an Ooni portable pizza oven that we use so I can’t say if it that dough works as well in the oven. I totally get what you’re saying about not being able to find many recipes online that we can understand!
I follow the Caputo pizza dough makings, cook each of the 4 small pizzas separately on a stone in a basic kitchen gas oven, they are always amazing! Today, my husband I are going to make your rolls for the first time. Thanks for making this possible!
Thank you for sharing that with me, Joelle! We also do the Caputo pizzas and we have an Ooni portable pizza oven. It turns out so tasty! I don’t think any other flour would even be a close second for GF pizzas! I hope you like the dinner rolls!!